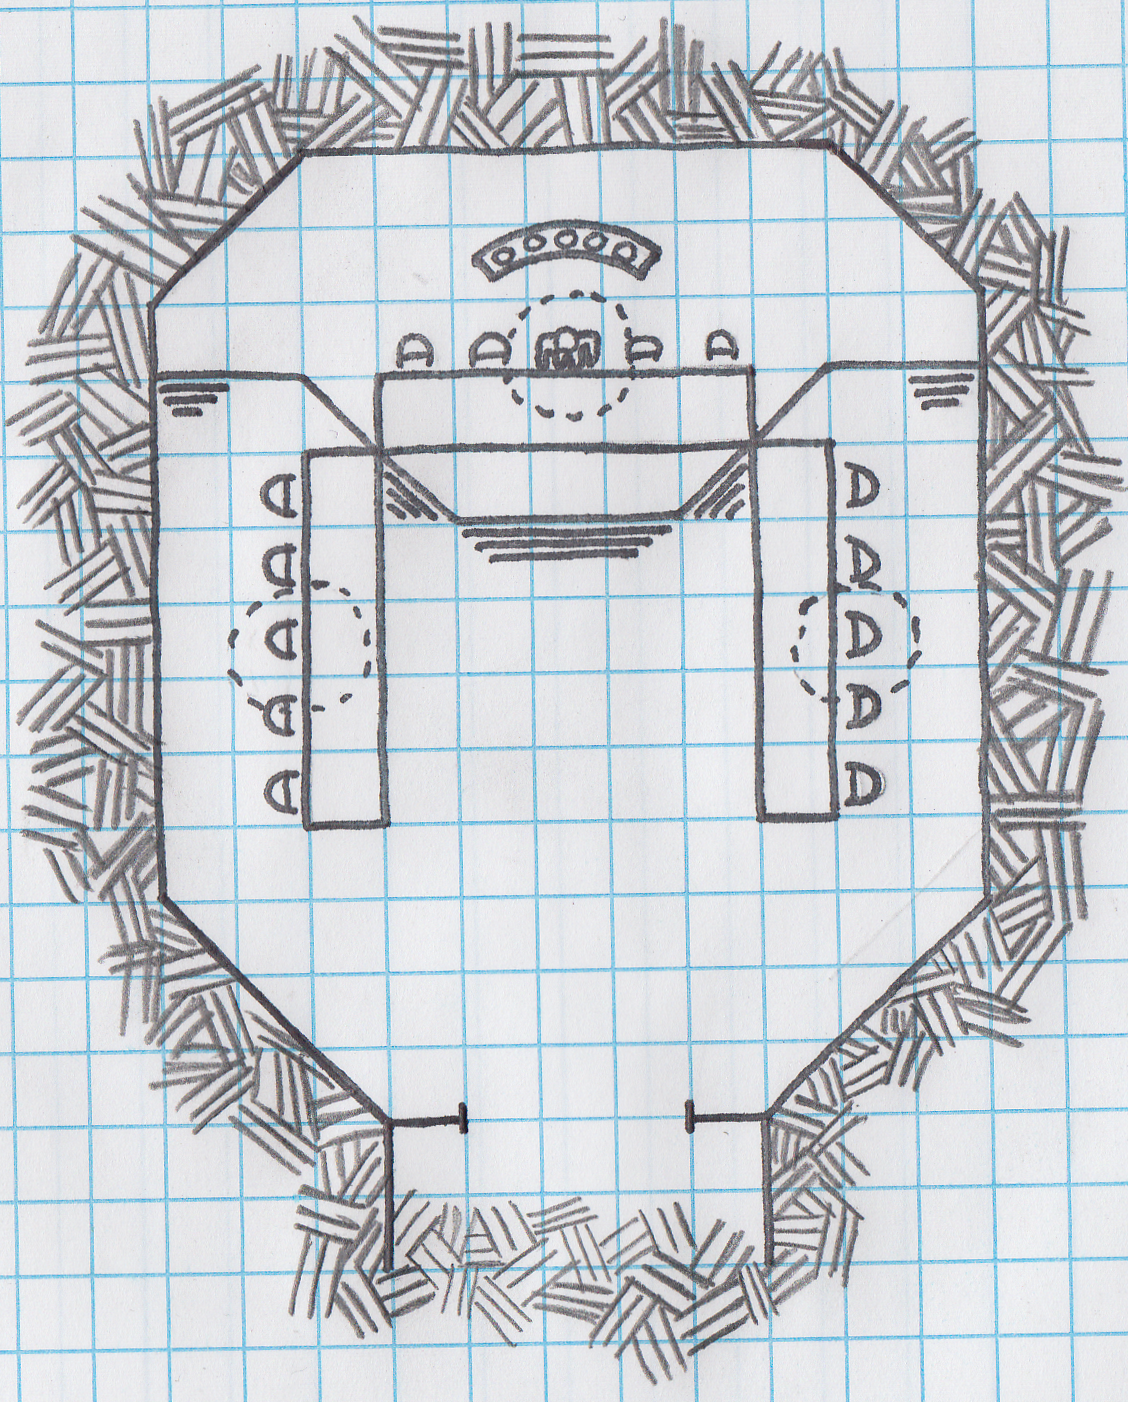
| The Shrine of the Lost God |
On a pedestal there is a a shining golden idol of the Lost God of the Tangledark tribe. A stone staircase leads up to the pedestal. Feature: Around the walls are pictographs using an incomprehensible set of symbols. Along the east wall is a mural that appears to be depicting the apotheosis of a cat-headed being.
Feature: Sunlight streams green and gold through the shafts in the ceiling, filtering through the overgrown jungle trees.
Trap: Poisoned darts fly from the east wall when you step on the third, sixth, and ninth steps while climbing toward the idol.
Trap: If you take the golden idol, a rolling boulder trap triggers from the west wall.
Monster: A swarm of spiders have made a cozy nest of webs in the northwest corner, near the ceiling.
|
| The Burial Chamber of Sir Gordan the Green |
Behind the heavy stone slab and down a set of narrow stairs is a small bare chamber with empty wall sconces and a large stone coffin. Feature: The coffin bears the inscription, "Here lies Gordan, Sword of the Realm, Hero of the Battle of West Vale and the Battle of Harstone Pass, b. 1178, d. 1239"
Monster: Sir Gordan is cursed, he animates as a wight on nights of the new moon. On all other nights, he lies peacefully in his coffin and is indistinguishable from a normal corpse.
Treasure: Sir Gordan has been buried with a finely-crafted steel longsword with gilding on the guard and a large emerald (2,000 sp) embedded in the pommel.
|
| Spruce Spanner's Cogwheel Emporium |
Just beyond the plain wooden door lie dozens of rows of tiny, clockwork objects. Clicks and ticks echo throughout the room as toys and other marvels whir to life. Feature: Behind the counter stands a large clockwork golem dressed in fine silk clothing. A black with white trim top hat adorns his head.
Trap: Near the doors to the stock and equipment rooms are two small metal plates built into the wall. In the center of the plates lie tiny circular keyholes. Should anyone try to force open the door or pick the lock without the proper key, an electric current is rigged to blast from the plates into the intruder.
Hazard: The clockwork golem, while generally a peaceful servant and helper, will spring to life should the shop be in danger. Hidden under his suit coat are 2 spring loaded hand crossbows that are rigged to propel into his hands at a moment's notice. Behind the counter there's a large maul - far too heavy for ordinary men - should he require it.
Treasure: Aside from the wondrous toys and gizmos, there's one piece in particular that catches the eye. It's a small butterfly like machination that's been enchanted to fly. Its wings are beautifully inlaid with gold and turquoise.
|
| Sphax's Cave of Destiny |
Home to a mad, would-be god, this ordinary cave is littered with pebbles and stones. In the center is a plain wooden chair. Feature: The Cave of Destiny is heavily enchanted. Beings who enter the room are immediately thrown the the ceiling as gravity reverses.
Hazard: Up is down - down is up. When gravity reverses, the once still rocks and pebbles fling upwards to rest on the ceiling. The chair, however, stays put.
Monster: This room belongs the Sphax, the would-be god of Chaos. He thinks himself mighty, and has the powers to oftentimes prove it, but he seldom resorts to violence. Sphax loves to sit and have a nice chat with anyone he runs across - until they anger him that is. His diminutive gnomish frame should not be mistaken for being frail. Though he may dress like a peasant and sit and talk with newcomers, Spahx is a very dangerous being...when he feels like being one, that is.
|
| Costrin Spawning Pools |
Situated in the roots of a massive mangrove, the larva of a primitive jungle race are maturing in the muddy pits dug into the soft ground. Feature: A circular dam of mud and sticks built into the exterior roots holds the surrounding swamp at bay and marks the boundary of the room, but enough water leaks through to keep the whole room muddy.
Monster: The adult Costrin, in their typical brutality, have trapped a Giant Frog in the room to weed out the weak larvae.
Hazard: The floor is pockmarked with pits, each about 5 feet deep and 3 feet in diameter. Each has a few hideously squirming Costrin larvae in it, except one which instead has a pupa and the half eaten corpse of a Giant Frog. Step in a pit and you may just lose a foot to the carnivorous larvae.
Treasure: Each larva has a heavy weight chained to a piercing in its exoskeleton, intended to keep it in the pit until it sheds the shell and becomes a free roaming pupa. The weights are each formed from 10-15 pounds of iron, which may be worth something to a metallurgist.
|
| Modron Factory 7882 - Plating Room |
This blisteringly hot room is mostly occupied by a massive automated production line, which in this room applies plating to monodrones. Feature: The room is mostly filled with a straight metal path, with countless modrons marching along it. The path begins in a further on room, and the monodrones continue marching through a hole in the wall into the previous room. Large machine arms work on the modrons.
Monster: There are several tridrones guarding the assembly line. The monodrones are still awaiting higher programming, but could be a danger if you get in the way of their ceaseless march through the assembly line.
Hazard: Huge clockwork arms swing around the room, grabbing pieces from piles and adding them to the unplated modrons marching from a hole in the far wall.
Treasure: The brass, bronze, and silver plates could be immensely valuable.
|
| The Room of Deafness and Blindness |
Entering into the room, the party sees coffins lining the wall. A metal statue on the opposite side of the room glows with a strange light. The statue if of a blind god, and its eyes are covered with a cloth. As the players enter, their vision becomes cloudy and the ambient sounds dwindle into nothingness. Feature: The players are completely blinded and deafened due to the magical aura emanating from the statue.
Feature: The players are completely blinded and deafened due to the magical aura emanating from the statue. Feature: The statue pulses once per round, causing blindness and deafness.
Feature: The statue pulses once per round, causing blindness and deafness. Monster: Two ghouls immediately break free from the coffins. The ghouls are blind, and have enlarged ears and fingers. They can wall climb and have tremorsense.
Monster: Two ghouls immediately break free from the coffins. The ghouls are blind, and have enlarged ears and fingers. They can wall climb and have tremorsense. Feature: Significantly failing a stealth check or making large noises causes additional ghouls to rise from the coffins in the room. For DMs: anything the players say at the table immediately gets translated in-game.
Feature: Significantly failing a stealth check or making large noises causes additional ghouls to rise from the coffins in the room. For DMs: anything the players say at the table immediately gets translated in-game. Feature: Striking the statue with a metal object causes the statue to ring, which will stun nearby ghouls for 1 round.
Feature: Striking the statue with a metal object causes the statue to ring, which will stun nearby ghouls for 1 round. Feature: The effects of blindness and deafness can only be completely defeated if the players destroy the statue.
Feature: The effects of blindness and deafness can only be completely defeated if the players destroy the statue. Treasure: The cloth covering the statue is a magical item that grants blindsight for 1d6 rounds per day.
Treasure: The cloth covering the statue is a magical item that grants blindsight for 1d6 rounds per day. |
| The Chambers of the Robber Queen |
Behind a hidden door is a once lavishly furnished sitting room, now fallen to decay. Feature: Tattered silk hangs from the rafters, frayed tapestries line the walls, and the floor is covered in thick, moss-ridden carpet.
Feature: An opened (and empty) tall cabinet leans drunkenly against the far wall, and a single wooden chair is upright just to the right of the doorway. If there is any other furniture, it has been smashed to kindling.
Hazard: The floor in the center of the room is rotted through, and may collapse into the room below under the weight of more than one adventurer.
Trap: Six wicked-looking darts are embedded in the wall opposite the cabinet, but the mechanism that fired them is no longer functional.
Treasure: The skeletal remains of an unfortunate treasure hunter partially block the doorway, in which can be found a tarnished silver locket (15sp) and a small quantity of gold and silver pieces (2d6 gp, 4d6 sp).
Feature: Careful study of the wooden chair reveals that it is bolted to the floor. If lifted, the rusted hinge mechanism breaks, and reveals a hidden ladder into the room below.
|
| The Bat's Mouth |
Past a surly bouncer and beyond a sturdier door is a large, smoke-filled chamber. Feature: A massive table - hewn from dark, fine grained wood - fills most of the room, with heavy chairs constructed from brass and stained leather placed at regular intervals around it.
Feature: Heavy velvet drapes are pulled across large picture windows on the East wall, as well as the area at the back of the room.
Monster: A Gargoyle perches on a ledge above the door, and will attack anything that doesn't wear a badge of the Brotherhood of the Bat's Mouth.
Monster: Most evenings, the room will be occupied by 2d4 Commoners and 1d4 Veterans in dark robes.
Trap: If any of the drapes are moved, 4d4 Swarms of Bats pour into the room.
Treasure: A locked chest (each Commoner and Veteran has a 10% chance of carrying the key) in the curtained-off area contains gems totalling 300gp in value, 1000 gold pieces, and Wings of Flying
|
| The Displaced Throne |
The caves open into an enormous room split in half by a strange line of runes, with natural stone floors and walls abruptly becoming the fine stonework and furnishings of an opulent throne room Feature: At the center of the far wall is a throne backed by an enormous stained glass window, sunlight streaming in. On the throne is a golden crown.
Feature: Two sets of armor flank the throne. Upon crossing the runic threshold they spring to life and attack the players
Monster: Two Helmed Horrors are disguised as suits of armor will attack any intruders, chasing them across the runes if need be.
Treasure: On the throne is a magnificent jeweled crown. This is actually a Helm of Teleportation
|
| Old Dragons Lair |
This enormous cavern resembles a giants furnace, blackened and charred from a heat so intense the stones were left melted and cracked. Scattered across the floor are mounds of metallic slag. Features: Massive mounds of melted gold and steel, the remnants of a dragons horde, create a mixture of difficult and impassible terrain.
Monsters: Several Thrikeen oversee some domesticated Rust Monsters excavating melted metal slurry.
Treasure: The rust monsters have eaten into the center of one of the mounds, revealing several gemstones that were protected from the heat by the melted metal shell.
|
| Guards of the Brothel of the Lancer's Tilt |
(Not quite a dungeon, but it fits the theme based upon my definition) The Lancer's Tilt is a is a very upscale, themed brothel. The sign shows a knight with his lance, positioned in a suggestive manner, poking up the skirt of a maiden. Upstairs is the brothel proper for paying members only. A ma�tre d'h�tel stands behind a desk upstairs and greets clients. Inside the brothel is a band, a bar, bouncers and upscale clientele. The floors are carpeted, there are tapestries, and various colorful suits of armor and weaponry adorn the walls. The workers at the brothel are all dressed thematically, but suggestively: low-cut cuirasses, leather thongs, adventurer's packs, plate metal bras, etc. Feature: The ma�tre d'h�tel has a small runic stone of AntiMagic Field behind the desk he stands at.
Feature: The ma�tre d'h�tel has a small runic stone of AntiMagic Field behind the desk he stands at. Feature: Destroying the runic stone dispels the AntiMagic field. The ma�tre d'h�tel will crush the stone if he feels threatened or attacked.
Feature: Destroying the runic stone dispels the AntiMagic field. The ma�tre d'h�tel will crush the stone if he feels threatened or attacked. Monster: The carpeting on the floor is a Rug of Smothering. It remains dormant while the antimagic field is in place.
Monster: The carpeting on the floor is a Rug of Smothering. It remains dormant while the antimagic field is in place. Monster: The wall tapestries are flying Rugs of Smothering. It remains dormant while the antimagic field is in place.
Monster: The wall tapestries are flying Rugs of Smothering. It remains dormant while the antimagic field is in place. Monster: The suits of colorful armor decorating the room are Animated Armors. It remains dormant while the antimagic field is in place.
Monster: The suits of colorful armor decorating the room are Animated Armors. It remains dormant while the antimagic field is in place. Monster: The weapons on the wall are animated flying weapons (flying sword, flying mace, etc.). It remains dormant while the antimagic field is in place.
Monster: The weapons on the wall are animated flying weapons (flying sword, flying mace, etc.). It remains dormant while the antimagic field is in place. Treasure: The stone of AntiMagic field projects AntiMagic field in a 30 foot radius and lasts for 10 days.
Treasure: The stone of AntiMagic field projects AntiMagic field in a 30 foot radius and lasts for 10 days. Treasure: The animated armor, weaponry and rugs are exceptional and worth a combined 3,500 gp if they can be properly disenchanted.
Treasure: The animated armor, weaponry and rugs are exceptional and worth a combined 3,500 gp if they can be properly disenchanted. |
| The Machinist's Door |
Entering in the room, the party sees multiple runic inscriptions on the ground, forming multiple circles. On the far end is a door. To its left are 4 small levers. On the ground are several mechanical parts: cogs, springs, sprockets, etc. The parts are ethereal in nature and not of this world. To the right is a wooden ladder leading up to a platform 20 feet into the air. At the top of that platform are 4 consoles, and each console is in a various state of disrepair. Feature: Touching the parts on the ground causes the parts to materialize. Letting go of them causes the parts to vanish and reappear in the pile.
Feature: To leave the room, the party must repair all 4 consoles, and activate the corresponding levers on the ground. Repairing the machines requires an investigation/tinkering check. The check DC increases from 1 machine to the next.
Monster: Every 3 rounds, clockwork pests (see Monster A Day Manual /r/monsteraday) for specs) materialize from the runic circles in the ground and attack the party. The number of pests increases by 1 every 3 rounds.
Feature: The consoles, if repaired, will break down on their own after 12 rounds, unless their corresponding lever has been activated. Broken down consoles have their parts return to the pile below.
Feature: The levers retract after 1 round and the console self-destructs unless a player is actively holding down the lever.
Monster: Every time the players fail the repair or the levers return to their starting position, a group of clockwork pests spawns and attacks.
|
| The Sparrow Cleric's Refectory |
High, slanted windows lets cool, dust-filtered light into a spare room. Feature: A narrow, rectangular table, with benches along its long sides abuts what appears to be a writing desk on its north end. All have been covered in stained linens that may have been white in a past life.
Feature: Seated at the long table are four crudely shaped clay statues, all dressed in a mishmash of gowns, wimples, cassocks, hijabs, and a host of other religious paraphernalia. Before them are dishes filled with dirty water, dust, and the dessicated remains of a rose bush.
Feature: Seated at the writing desk is a mummified corpse in raiment crafted from cloth of gold, silk, and precious jewels, posed with wires and sticks in a position of blessing.
Trap: If disturbed, the corpse (including its clothing) crumbles to dust, and the statues come to life. Each is a Clay Golem, and will not attack unless attacked first. Rather, they move to block the entryway, and will (non-lethally) attempt to prevent all creatures from leaving the room.
Feature: If the linens are removed from the long table, an inscription is revealed. A player can make a DC18 religion check to read it with the correct pacing and intonation. On a successful check, the golems crumble; on a failure, the golems attack one another, destroying themselves and everything they contain in the process.
Treasure: The remains of the golems contain 8d12 gp worth of silver and gold-wrought ikons, several minor magical items, and a manual of golems.
|
| The Puzzle of the Star |
(I love this room, because it's a fun challenge and positively wicked at the end!) A 20x20 room is simply decorated and unlit, with two noticeable exceptions. On the ground are several sets of runic inscriptions, written in circles. There is a 3 foot long, wooden table in the room. On the table is a small bag, a rolled up scroll and a small golden circle. Trap: Once the players touch the items on the table, the door they came from shuts magically and locks.
Trap: Once the players touch the items on the table, the door they came from shuts magically and locks. Feature: The small bag contains 10 small golden coins with unknown markings on them.
Feature: The small bag contains 10 small golden coins with unknown markings on them. Feature: The scroll, once opened, says the following: In darkness dwells the puzzled mind, That frets and worries and passes time, Ten round coins of gold most pure Lay them in the circle secure When you make five rows of four, A star will light to show the door.
Feature: The scroll, once opened, says the following: In darkness dwells the puzzled mind, That frets and worries and passes time, Ten round coins of gold most pure Lay them in the circle secure When you make five rows of four, A star will light to show the door. Feature: Once the scroll is touched, a 1 minute (real world!) timer starts.
Feature: Once the scroll is touched, a 1 minute (real world!) timer starts. Monster: Once 1 minute has gone by, several monsters materialize from the summoning circles and attack. Every additional minute that goes by spawns one more monster than the previous spawn (e.g. 4, then 5, then 6....). I prefer to use stirges or Banelings from the Monster a Day manual (/r/monsteraday). Once the puzzle has been solved, the monsters vanish and no longer spawn.
Monster: Once 1 minute has gone by, several monsters materialize from the summoning circles and attack. Every additional minute that goes by spawns one more monster than the previous spawn (e.g. 4, then 5, then 6....). I prefer to use stirges or Banelings from the Monster a Day manual (/r/monsteraday). Once the puzzle has been solved, the monsters vanish and no longer spawn. Feature: Solution - Players must use the 10 gold coins to form the shape of a 5 pointed star (5 coins on the outer points, 5 coins on the inner pentagon of the star) inside the golden circle on the table.
Feature: Solution - Players must use the 10 gold coins to form the shape of a 5 pointed star (5 coins on the outer points, 5 coins on the inner pentagon of the star) inside the golden circle on the table. Treasure: Once the puzzle has been solved, the coin star begins to glow, and a 5 foot door magically appears and opens on the far end of the room. That door leads to a room that is exactly 5 feet by 5 feet. Inside that room is a 2 foot tall pedestal with a magical circlet with upon it. The circlet is gold, inlaid with 2 deep red rubies and a large, deep blue Tanzanite gem in the middle. It is a headband of intellect +2.
Treasure: Once the puzzle has been solved, the coin star begins to glow, and a 5 foot door magically appears and opens on the far end of the room. That door leads to a room that is exactly 5 feet by 5 feet. Inside that room is a 2 foot tall pedestal with a magical circlet with upon it. The circlet is gold, inlaid with 2 deep red rubies and a large, deep blue Tanzanite gem in the middle. It is a headband of intellect +2. Monster: The pedestal and headband are inside an unmoving gelatinous cube. Reaching into the 5x5 room with the pedestal causes the players to reach into the cube, and the cube will make an ambush attack and suck the player inside it.
Monster: The pedestal and headband are inside an unmoving gelatinous cube. Reaching into the 5x5 room with the pedestal causes the players to reach into the cube, and the cube will make an ambush attack and suck the player inside it. Monster: The 10 coins in the room are mimics that will awaken and attack if they are removed from the room.
Monster: The 10 coins in the room are mimics that will awaken and attack if they are removed from the room. Treasure/Trap: The sack that held the coins has a 50% chance to be a miniature Bag of Holding, or a 50% chance to be a miniature Bag of Devouring.
Treasure/Trap: The sack that held the coins has a 50% chance to be a miniature Bag of Holding, or a 50% chance to be a miniature Bag of Devouring. DM Note: This room is very memorable if you can supply the bag, coins and scroll to the party at the table. I used 10 fake pirate coins from my kids playset, shoved into a dice bag. Also typed up the scroll on a piece of paper. |
| The Shrine of Suffering |
Players enter a 30x30 circular room. The stone walls are grey and bleak, and the floor is blood red. From the ceiling dangle dozens of large chains. The wall is adorned with dozens of iron rings bolted into the stone. These rings appear to be wall restraints for manacles. This appears to be some kind of ritualistic torture chamber. Feature: In the center of the room is a large brazier with a bright burning flame.
Feature: In the center of the room is a large brazier with a bright burning flame. Feature: On the far end of the room is a large obsidian statue of a goddess, all in black, holding a small bowl of flame in her hands. The flame burns with a bluish intensity and instantly melts flesh and bone if a player touches it. The statue is of Loviatar, the goddess of death.
Feature: On the far end of the room is a large obsidian statue of a goddess, all in black, holding a small bowl of flame in her hands. The flame burns with a bluish intensity and instantly melts flesh and bone if a player touches it. The statue is of Loviatar, the goddess of death. Feature: On one of the walls is written, in blood, the text: suffer. In very faded text below it is written: for me.
Feature: On one of the walls is written, in blood, the text: suffer. In very faded text below it is written: for me. Trap: After 1 round, the door they came from magically locks behind them, and the flame in the center burns with a bright blue intensity. The chains in the ceiling animate and attack the players. Each chain attempts to grapple a players' arms (1 chain per arm). Successfully attacking both arms restrains the player and pulls them toward the flame in the center of the room.
Trap: After 1 round, the door they came from magically locks behind them, and the flame in the center burns with a bright blue intensity. The chains in the ceiling animate and attack the players. Each chain attempts to grapple a players' arms (1 chain per arm). Successfully attacking both arms restrains the player and pulls them toward the flame in the center of the room. Monster: 2 rounds after entering the room, 2 hell hounds appear from the flame in center of the room. Players can defeat the room by destroying the hellhounds.
Monster: 2 rounds after entering the room, 2 hell hounds appear from the flame in center of the room. Players can defeat the room by destroying the hellhounds. Trap: 2 rounds after entering the room, the flames in the center spread radially out 5 feet, and continue to spread radially 5 feet every round. Standing in the flame deals fire damage.
Trap: 2 rounds after entering the room, the flames in the center spread radially out 5 feet, and continue to spread radially 5 feet every round. Standing in the flame deals fire damage. Feature: If a player calls out to suffer voluntarily, the flames coalesce back to the center of the room, the chains will release everyone else and wrap around the player from head to toe, and pull the player into the flame in the center of the room. If the player takes damage 3 times as the volunteer (including self-inflicted or from the party), the hellhounds vanish, the flames subside, and the flames in the bowl of the statue vanish.
Feature: If a player calls out to suffer voluntarily, the flames coalesce back to the center of the room, the chains will release everyone else and wrap around the player from head to toe, and pull the player into the flame in the center of the room. If the player takes damage 3 times as the volunteer (including self-inflicted or from the party), the hellhounds vanish, the flames subside, and the flames in the bowl of the statue vanish. Treasure: The bowl in the statue contains a ring of spell storing, only if a player sacrifices themselves in the room. Otherwise it's empty.
Treasure: The bowl in the statue contains a ring of spell storing, only if a player sacrifices themselves in the room. Otherwise it's empty. |
| Hallway of Skulls |
A narrow section of a stone hallway with shelves carved into the walls. Seated upon these shelves are skulls of various creatures, some with dried flesh still attached. Trap/Monster Upon reaching the middle of the section, a large skull with gems in it's eye sockets will be seen sitting on one of the shelves. Unfortunately, that means the skull can also see the party. Upon spotting the party, two stone slabs drop on either end of the skull section, as the skulls start swarming around the party members trapped, biting at their flesh. The only way to stop the swarm of biting skulls is to target and destroy the skull with the gems, which is not easy to do as the PCs try to hit one specific skull in a swarm of them, but the vengeful spirit within it is responsible for animating the other skulls.
Trap/Monster Upon reaching the middle of the section, a large skull with gems in it's eye sockets will be seen sitting on one of the shelves. Unfortunately, that means the skull can also see the party. Upon spotting the party, two stone slabs drop on either end of the skull section, as the skulls start swarming around the party members trapped, biting at their flesh. The only way to stop the swarm of biting skulls is to target and destroy the skull with the gems, which is not easy to do as the PCs try to hit one specific skull in a swarm of them, but the vengeful spirit within it is responsible for animating the other skulls. Treasure Once the skull with the gems is destroyed, the two gems turn out to be quite valuable.
Treasure Once the skull with the gems is destroyed, the two gems turn out to be quite valuable. |
| Caught between a Blob and a Sharp Place |
The hallway appears rather ordinary. It's 40 feet long and 15 feet high. The floors and walls are fine stonework. The ceiling is wooden, and well decorated with intricate carvings. The hallway turns 90 degrees at the end and appears to continue on. Trap: At one point in the hallway there are a pair of blades that are triggered by the slightest movement. The set of blades extract from between the stonework wall at a height of approximately 3-5 feet, extending perpendicular to the ground.
Trap: At one point in the hallway there are a pair of blades that are triggered by the slightest movement. The set of blades extract from between the stonework wall at a height of approximately 3-5 feet, extending perpendicular to the ground. Trap: At a second point in the hallway there are a pair of blades that are triggered by the slightest movement. The set of blades extract from between the stonework wall at a height of approximately 1-3 feet, extending perpendicular to the ground.
Trap: At a second point in the hallway there are a pair of blades that are triggered by the slightest movement. The set of blades extract from between the stonework wall at a height of approximately 1-3 feet, extending perpendicular to the ground. Trap: At a third point in the hallway there are a pair of blades that are triggered by the slightest movement. The set of blades extract from between the stonework floor and extend 12 feet into the air.
Trap: At a third point in the hallway there are a pair of blades that are triggered by the slightest movement. The set of blades extract from between the stonework floor and extend 12 feet into the air. Feature: Around the corner of the far end (past the 90 degree bend) of the hallway is a control panel. The panel has 4 control levers: 1 up, 1 down, 1 up, 1 down. The levers appear old and rusted in place. Some effort is required to move the levers. Three of the levers will lock the blades into position. The fourth lever controls an additional trap.
Feature: Around the corner of the far end (past the 90 degree bend) of the hallway is a control panel. The panel has 4 control levers: 1 up, 1 down, 1 up, 1 down. The levers appear old and rusted in place. Some effort is required to move the levers. Three of the levers will lock the blades into position. The fourth lever controls an additional trap. Trap/Monster: Activating the wrong lever causes the ceiling to open at the opposite end of the hallway (where the party starts), dropping a gelatinous cube into the hall.
Trap/Monster: Activating the wrong lever causes the ceiling to open at the opposite end of the hallway (where the party starts), dropping a gelatinous cube into the hall. Treasure: The gelatinous cube contains a +1 dagger inside its body.
Treasure: The gelatinous cube contains a +1 dagger inside its body. |
| The isle of Vuraal |
This is a round room about fifty feet across with a dome ceiling. Circling the room along the wall is a narrow ledge about a foot wide that is separated from the floor by a two foot gap. The floor itself is a circular disc. Feature: Peering into the gap that separates the floor from the walls reveals a deep pit with hundreds of sharp stalagmites piercing upward.
Monster: Vuraal, the hooded assassin cloaked in silken robes stands in the center of the room. He is highly skilled, carries sharply honed daggers, and will fight to the death to prevent your passage through his chamber.
Trap: The floor of this room is a large circular disc balanced precariously on a giant central pivot from below. In order to stand on it safely, weight must be evenly distributed across it's surface. Fighting the assassin should prove immensely difficult.
Hazard: If the disk tilts far enough that you slide off it's edge, you will land in a pit of spikes.
Treasure: Passage through this chamber will be your reward.
|
| Skeleton Cafe |
In the midst of an otherwise dangerous dungeon, one finds a door with a sign that says "Skeleton Cafe" and another sign which reads "OPEN". The door knob opens easily and within lies a most unexpected jazz cafe. A small stage has a three piece lounge jazz band. There is a bar with a bartender. Everyone is a friendly skeleton. It's a small cafe, only three tables. Each table has four chairs. There are no customers. It is always open for "business". Feature: Very relaxing atmosphere. If possible, DM should play some light jazz audio at this time.
Monster: The skeletons are just regular skeletons. They are friendly and the bartender speaks with a slight southern drawl. Bartender introduces himself as "Bone Daddy" and offers the party drinks on the house from a selection of liquors on a shelf behind him. They are genuinely friendly (Neutral Good). If attacked, they will simply panic and plead for their life.
Trap: None, but the chairs are suspiciously plush and comfortable, and the bartender offers unlimited drinks which are suspiciously free and tasty.
Hazard: Open bar will feed players drinks until they get shit faced, if they keep asking for more booze.
Treasure: A safe spot to relax and enjoy a leisurely long rest can be a treasure unto itself.
|
| Button Room |
A completely empty, featureless 50 x 50 foot square-shaped room. In the centre of the floor is a pedestal. On the pedestal is a single large red button. On the wall, painted in huge block letters, are the words "DO NOT PUSH" DC 15 perception check will notice an array of 100 small valves across the ceiling (one over each 5' square). Feature: Nothing, really. There is nothing, nothing but the temptation of a single red button..
Trap: If the button is pushed, a massive gout of fire shoots downward out of the ceiling valves as a reaction. Flames fill the entire room, there is nowhere to go in terms of dodging the 10d6 fire damage. Trap resets each round and can be triggered over and over again if players keep pushing the button.
Treasure: None.
|
| WARNING |
I've used a variation of the tempting button room: When players enter the doors shut and lock and a voice begins to count down from 10. Whenever a player pushes the button, the voice resets itself back to 10. If they ever let the voice count all the way there's 10 seconds of silence and then the doors open. There were no traps and no effects other than the frustration of players to delay the seemingly inevitable. |
| The Cavern at the end of Shatterstone Mine |
There are three wooden support beams that hold the ceiling from collapsing in this dank, torch-lit cavern at the end of Shatterstone Mine. The air is slightly moist and leaves a burning sensation in the back of your throat like you've been inhaling some sort of chemical. Feature: In the center of the room there is a mound of some black, tar-like substance that is being added to by a gaggle of dwarven miners spread thinly about the room. They walk to the walls of the cavern, carve out more of it, and bring it to the mound.
Feature: In the center of the room there is a mound of some black, tar-like substance that is being added to by a gaggle of dwarven miners spread thinly about the room. They walk to the walls of the cavern, carve out more of it, and bring it to the mound. Monster: The dwarven miners in this room are mindless. You've probably fought a few of them leading up to this point, but these are different. They seem to be completely oblivious to your party as you enter. Each of them walks, slowly and steadily from the mound, to the wall and back again staring blankly ahead as they do so. If spoken to, they do not respond. If attacked, they fall easily and do not retaliate.
Monster: The dwarven miners in this room are mindless. You've probably fought a few of them leading up to this point, but these are different. They seem to be completely oblivious to your party as you enter. Each of them walks, slowly and steadily from the mound, to the wall and back again staring blankly ahead as they do so. If spoken to, they do not respond. If attacked, they fall easily and do not retaliate. Trap: If a creature other than the miners in the room touches the mound a green wave of energy, originating from the mound, courses through the room like a ripple. Each creature inside the cavern must make a DC13 dexterity saving throw to attempt to duck under the pulse. On fail, the creature takes 2d6 acid damage (halved on save). This instantly kills any remaining dwarven miners in this room.
Trap: If a creature other than the miners in the room touches the mound a green wave of energy, originating from the mound, courses through the room like a ripple. Each creature inside the cavern must make a DC13 dexterity saving throw to attempt to duck under the pulse. On fail, the creature takes 2d6 acid damage (halved on save). This instantly kills any remaining dwarven miners in this room. Monster: When the trap mentioned above is set off, or when all of the dwarven miners who are feeding the mound die, the mound begins to rise and take shape. Eventually, standing in the center of the room is a vaguely humanoid shaped golem made entirely of the thick, black substance the miners were bringing it. It attacks the players and, if you need it to be a bit of a challenge, has the acid nova ability described above on a recharge of 5-6.
Monster: When the trap mentioned above is set off, or when all of the dwarven miners who are feeding the mound die, the mound begins to rise and take shape. Eventually, standing in the center of the room is a vaguely humanoid shaped golem made entirely of the thick, black substance the miners were bringing it. It attacks the players and, if you need it to be a bit of a challenge, has the acid nova ability described above on a recharge of 5-6. |
| The Room of Misdirection |
Appears to be a normal study. A plain desk sits against the back wall, upon it, an assortment of open books and scrolls illuminated by a plain wax candle. A bookcase adorns the back wall to the left of the desk, stacked to the brim with miscellaneous books. Several crates overflowing with large scrolls are stacked to the right of the desk and On the wall above the desk hangs a decorative shield sitting upon two crossed swords. On the floor sits an unassuming rug. Feature: On the left hand wall hangs a tapestry depicting a man gripping his head surrounded on all sides by doors. A small makeshift sleeping bag with rotted supplies sits in the corner near the crates. Skeletal remains can be found in the sleeping bag, bones picked clean.
On the left hand wall hangs a tapestry depicting a man gripping his head surrounded on all sides by doors.
A small makeshift sleeping bag with rotted supplies sits in the corner near the crates. Skeletal remains can be found in the sleeping bag, bones picked clean.
Monster: two mimics disguised as the trap door and desk.
two mimics disguised as the trap door and desk.
Traps: Bookcase is a secret door. If swords are removed from shield then a secret passage opens up in righthand wall Trap Door under rug (mimic is disguised as trap door, however the passageway still exists beneath it). Primary door is affected by the magic of the room. Secret chute behind tapestry
Traps: Bookcase is a secret door.
If swords are removed from shield then a secret passage opens up in righthand wall
Trap Door under rug (mimic is disguised as trap door, however the passageway still exists beneath it).
Primary door is affected by the magic of the room.
Secret chute behind tapestry
Hazard: All exits in this room take the player to a random location in the dungeon. Once an exit in the room has been used it's exit location becomes fixed for 1 hour. Eg. If a player uses the chute behind the tapestry and appears in the dungeon kitchen then for the next hour the tapestry chute will only lead to the kitchen. Whenever a creature walks through a doorway they have not been through in at least 10 minutes they must roll a D20, on a 1 that player does emerge on the other side of the door and instead appears inside the Room of Misdirection.
Hazard: All exits in this room take the player to a random location in the dungeon.
Once an exit in the room has been used it's exit location becomes fixed for 1 hour. Eg. If a player uses the chute behind the tapestry and appears in the dungeon kitchen then for the next hour the tapestry chute will only lead to the kitchen.
Whenever a creature walks through a doorway they have not been through in at least 10 minutes they must roll a D20, on a 1 that player does emerge on the other side of the door and instead appears inside the Room of Misdirection.
Treasure: A diary can be looted from the Desk mimic detailing the previous adventurer's experience with the room.
Treasure: A diary can be looted from the Desk mimic detailing the previous adventurer's experience with the room. |
| Testing Lab |
In a room full of worktables and shelves are various jars with what appear to be liquids in them. Feature: The room contains what appears to be tools similar to alchemical equipment.
Monster: The liquids in the jars are not liquids, but rather Oozes and Slimes.
Trap: A scroll tube is locked and chained to one of the desks. Opening said tube causes a shrieking noise to fill the room, possibly shattering any glass objects the party is carrying, and definitely shattering all those jars full of Oozes and Slimes.
Treasure: Some of the equipment is actually alchemical equipment, and can be used by a PC alchemist or sold.
|
| A River Runs Through It |
This large natural cavern is littered with stalactites and stalagmites but its most notable feature is the underground river that runs through its center. Being 15' wide, it would be difficult to cross if it were not for the wooden bridge that crosses it. On the other side, glaring angrily at you is a small band of hobgoblins with their bows drawn. Feature: A well constructed wooden bridge leads to the other side of the swift river.
Trap: One of the planks in the bridge is the trigger to a poison gas trap.
Monster: A band of hobgolins are prepared with their bows to strike.
|
| The Boiler Room |
A clamorous room whose removable planks hide a still-operating machine. Its purpose is unknown. Feature: A great clamor fills this room, the grinding of gears, the thumping of pistons, and the hiss of steam all mixes into a terrifying cacaphony. You stand no chance of hearing anything that doesn't want to be heard (in 5e language: any creatures in the room have disadvantage on perception rolls relying on hearing.)
Hazard: Through holes in the aging wooden floor, three sets of huge metal rods rise, whirring and crossing. They seem easily capable of crushing anything unfortunate enough to find itself between them.
Trap: Stepping on a misplaced board near one of the sets of rods could send you onto the floor below.
Treasure: Removing the planks reveals the rest of the machine, a massive flywheel spins, controlled by an intricate series of whirling regulators. It is obvious that many could prove quite valuable. If only you could find a way to turn the machine off.
Trap: One of the more valuable parts happens to be holding the pressure of the boiler in. Those who would try to remove it are likely to get a faceful of hot steam.
|
| A Labyrinthian Space |
In pitch darkness, walls shift and space bends. Feature: Upon entering the room, your torch goes out, as though affected by the Darkness spell. Moments later, the spell is lifted, but turning around, you find naught but a plain wall.
Feature: Upon entering the room, your torch goes out, as though affected by the Darkness spell. Moments later, the spell is lifted, but turning around, you find naught but a plain wall. Hazard: Whenever not in view, a wall can shift. It can open into a hall, or make a doorway disappear.
Hazard: Whenever not in view, a wall can shift. It can open into a hall, or make a doorway disappear. Feature: Leaving the room through any of the doors is unlikely to leave you where you started. Instead, you may find yourself in a completely different area of the dungeon. Or perhaps many miles away. Its machinations are unknowable, but perhaps not entirely random.
Feature: Leaving the room through any of the doors is unlikely to leave you where you started. Instead, you may find yourself in a completely different area of the dungeon. Or perhaps many miles away. Its machinations are unknowable, but perhaps not entirely random. Feature: Upon leaving the Labyrinthian Space, running through the door you just left is unlikely to bring you back into it, as such spaces are transient and can shift in a blink of an eye.
Feature: Upon leaving the Labyrinthian Space, running through the door you just left is unlikely to bring you back into it, as such spaces are transient and can shift in a blink of an eye. |
| The Black Pool |
The room is a round, natural, cavernous space with a tall ceiling. The center of the cavern is separated by an oval filled with black water. On the opposite side is a tunnel, leading deeper into the dungeon. Feature: The walls are too smooth to have formed naturally, and are clean. Suspended just over the "water" and splitting the room in half is a Wall of Force.
Monster: The black "Water" is actually a black pudding ooze.
Trap:
Hazard: Players attempting to cross the water without touching it will strike the Wall of Force and fall right into the ooze.
Treasure: The ooze's past victim's belongings sit at the bottom of the pit occupied by the ooze, mostly tarnished and beyond recognition or value.
|
| The Greenhouse |
Likely not to be an expected interior feature, this square room smells of damp earth. It's the temperature of an autumn day, and lit by a tiny sun fixed to the high ceiling. Feature: The room is a self-contained, miniature forest for an agoraphobe, complete with the ability to rain or snow on command. Small trees, bushes, shrubs, and grass fill it, except for the five feet of hardwood that ring the room.
Monster: None, at first.
Trap: Several summoning traps fill the room with frogs, insects, animals, and reptiles of varying strength and size. Most leave intruders alone if they're left alone.
Hazard: Some of the plants are dangerous, and release spores or are just intelligent and ambulatory enough to trip and restrain.
Treasure: None; animals summoned return to their native planes on death, and any plants removed from the room quickly wither.
|
| The Suspended Ceiling |
This room is several floors up in a wizard's tower, but not yet the top floor. It is a round room approximately 25 feet in diameter, with a heavy stone ceiling only 8 feet above the floor. Feature: There are windows on the east and west side.
Feature: A wide staircase curves around the outer wall leading up from the floor below and continuing on up to the next floor. The staircase stretches 24 feet around the perimeter, with no railing. The ceiling opens up for the last 16 feet of the staircase. Tall explorers may have to duck to avoid bumping their head as they go up the stairs. Feature: Eight black rods jut out from the walls at regular intervals around the room. They rise at a 45 degree angle, from about 6 foot height, up toward the ceiling. Each rod is 2 feet long and they appear to hold up the ceiling. Closer inspection reveals that they each end anywhere from 4 to 6 inches short of the ceiling. Further inspection reveals a small button near the bottom end of each rod, and a successful arcana check will recognize them as immovable rods.
Feature: Eight black rods jut out from the walls at regular intervals around the room. They rise at a 45 degree angle, from about 6 foot height, up toward the ceiling. Each rod is 2 feet long and they appear to hold up the ceiling. Closer inspection reveals that they each end anywhere from 4 to 6 inches short of the ceiling. Further inspection reveals a small button near the bottom end of each rod, and a successful arcana check will recognize them as immovable rods.
These rods constitute the room's treasure and its trap. Pressing the button releases the rod. Players may remove up to 4 rods safely, but it takes 4 rods to hold the ceiling up. The several inches between the rods and the ceiling are an invisible magical buffer to evenly distribute the weight of the upper floors. If a fifth rod is removed, the ceiling above gives a groaning screech and begins to slide downward. Players must immediately replace a rod, within the six inch buffer. Failing that, the ceiling hits the remaining rods, destroying them. The players must then replace four rods, simultaneously, within the buffer. To accomplish this, roll 4 dex throws. All 4 rolls must fall within a range equal to the sum total of dex bonuses of all characters involved in the attempt. Failing that, hope the players can make it to the stairs or windows. This room may be populated with any other furnishing or treasure, but if the ceiling falls, all will be crushed. |
| The Captain's Quarters |
Walking into the candle-lit room, you feel the wooden boards creak beneath your feet and take in the medium-sized room where the captain spends his time. Quills and ink lie on the large wooden desk in the far corner of the room and dim moonlight shines through the single window on your left. Feature: A map table lies immediately to the left of the doorway, at a glance you see the familiar lands marked with a number of small pins denoting cities and trading ports. On a second look, you notice a few islands on the map you don't recognize.
Feature: A map table lies immediately to the left of the doorway, at a glance you see the familiar lands marked with a number of small pins denoting cities and trading ports. On a second look, you notice a few islands on the map you don't recognize. Treasure: Just below the window is a large wooden chest, sealed with a sturdy iron lock.
Treasure: Just below the window is a large wooden chest, sealed with a sturdy iron lock. Feature: A number of letters are stacked neatly at the edge of the captain's desk, sealed in wax, awaiting delivery when the ship docks next.
Feature: A number of letters are stacked neatly at the edge of the captain's desk, sealed in wax, awaiting delivery when the ship docks next. |
| The Tinkerer's Chest |
The room has a solid grate in its center. Scorch marks mar the floor and walls. There is a very solid iron door that seems to slide into place. Feature: Towards the back of the room there is a large chest with 5 leavers: one red, one blue, one green, one white and one black. There does not seem to be any visible seams on the chest itself.
Trap: As soon as a leaver is pulled, the door slams shut and a ticking sound starts. The levers must be pulled in the correct order or all pulled leavers reset and something happens. Note: with 5 levers, if the party is keeping track they risk a max of 10 failures. Reducing it to 4 levers will make 6 the max (remove the red or black). Green leaver: This is the first leaver that needs to be pulled. Nothing bad happens Red leaver: This needs to be pulled 2nd. If the green leaver is not down then a small ball of fire is shot just in front of the chest. 3d6 damage or half on a DC 14 DEX save (advantage on future attempts for knowing what to expect) Black leaver: This needs to be pulled 3rd otherwise the person pulling the leaver suffers 2d10 necrotic damage. A successful DC 15 CON save will half the damage. Blue leaver: This needs to be pulled 4th. There is no immediate damage when this is pulled but water starts pouring into the room from above. The room fills at a rate of 2 feet per minute with the room being completely full within 8 minutes. This does not stop until the chest is opened or the room is filled. The players may need to swim down to the chest if the room fills more than a few feet. White leaver: This leaver needs to be pulled last otherwise a lightning bolt shoots out at a random angle. Those in the line take 1d12 lightning damage or half on a DC 14 DEX save (no advantage of future rolls since the source is random). If the blue leaver is already pulled then anyone currently in the water automatically takes the damage and there is no save.
Green leaver: This is the first leaver that needs to be pulled. Nothing bad happens
Red leaver: This needs to be pulled 2nd. If the green leaver is not down then a small ball of fire is shot just in front of the chest. 3d6 damage or half on a DC 14 DEX save (advantage on future attempts for knowing what to expect)
Black leaver: This needs to be pulled 3rd otherwise the person pulling the leaver suffers 2d10 necrotic damage. A successful DC 15 CON save will half the damage.
Blue leaver: This needs to be pulled 4th. There is no immediate damage when this is pulled but water starts pouring into the room from above. The room fills at a rate of 2 feet per minute with the room being completely full within 8 minutes. This does not stop until the chest is opened or the room is filled. The players may need to swim down to the chest if the room fills more than a few feet.
White leaver: This leaver needs to be pulled last otherwise a lightning bolt shoots out at a random angle. Those in the line take 1d12 lightning damage or half on a DC 14 DEX save (no advantage of future rolls since the source is random). If the blue leaver is already pulled then anyone currently in the water automatically takes the damage and there is no save.
Treasure: Once the leavers are pulled in the right order, the grate in the center of the room opens and drains any water. The top of the chest slides sideways to reveal a small mechanical mouse with a crank on it's back. When winding the mouse, it will lock onto whatever object (or person) is directly in it's vision. It will then attempt to follow/catch them at a speed of 30 ft per turn. Upon reaching it's target (or after 5 minutes whichever is first) it discharges an electrical aura dealing 3d10 lightning damage to those within 5 ft. Recharges once a day.
|